Wednesday, December 31, 2008
REWARD for Main Street Shoppers
We'd like to encourage all of our readers to support local businesses. For a limited time, if you bring in your receipt from any Town Square merchant, you will receive 10% of your order at Square Beans! (Same day only). Come on down to the square and see what you've been missing!
Happy New Year!
We hope 2009 brings you good health, happiness, prosperity (and the occasional latte!)
Help us celebrate the new year with a couple of wonderful music events:
Joy Pierce and Jordan Stovall - THIS Friday Jan 2nd 7 - 9 PM.
Michael Cooper - Saturday Jan 17th 2 - 4 PM.
Help us celebrate the new year with a couple of wonderful music events:
Joy Pierce and Jordan Stovall - THIS Friday Jan 2nd 7 - 9 PM.
Michael Cooper - Saturday Jan 17th 2 - 4 PM.
Do You Twitter?
Its the latest thing. Just click on "Follow us on Twitter" below right (free signup required). Now when you check your twitter, you will see whats happening at Square Beans. I update it pretty frequently. It's a great way to meet other 'twitters' with like initerests. There are also versions of the app for your phone etc.
Monday, December 15, 2008
Its a Sign!
OK so I'm not much of a blogger! I promised to update the blog with the progress of the new sign I am making. Well the sign is now complete and I'm just getting around to posting the pics. I still have to design and have the support built so we can hang it but this should get us caught up to today:
First an introduction. When we decided on the location, we knew there was an issue with the signage. As you can see from this photo, the area above the windows/awning is hidden for half the year by two large Ginko trees.
I like the trees especially in their fall color but they do present a problem for signage. So we decided to do what the previous proprietor did and place our signage on the two large picture windows instead.
This idea worked pretty well and got us past our opening however, they were not very visible from a distance so the first thing we did was add the blue background color.
This was better but we still received lots of comments that indicated that our shop was still not very noticeable by drivers and from pedestrians walking along the north sidewalk. Finally, I decided we need to go ahead and put a sign up over the awning. My idea was to create a wooden sign based on our logo and hang it projecting (perpendicular) from the wall so that it would be easily seen behind the trees when driving along Center street and walking along the north side of the square.
The next step was to get a design approved by the Historic District Commission. This is not difficult but it can be time consuming. They only meet once a month and the application has to be in a month before that. There is also a lot of detail that goes into the application and you must follow the design guidelines. Our application was approved in the meeting on September 18th. One of the stipulations in approving the design is that I have to remove one of the signs in our windows since you can only have two signs facing the street.
Time to start on building the sign. Originally, I was going to use a local sign company to build the sign but when I explained what I wanted, they said they couldn't build that kind of sign and said I'd have to find someone else so I decided to make it myself. I started by looking for the right wood. One of our customers, John Hall, suggested checking out Craig Lumber, for hardwood choices. I explained to them what I wanted to do and he suggested a piece of Japanese Poplar. It was 14" by 10' and 1 1/4" thick. They ripped it to 11" and planed it smooth for me. Next, using the blue print that was submitted to the HDC:
I blew it up and printed it out in multiple sheets at full size then taped the sheets together to form templates for each section of the sign.
Now to transfer the design to the wood. First I tried cutting out the design and tracing it but this would not work very well with the text.
So I tried and old trick from art school, I rubbed the back of the paper with a soft pencil (later I used black charcoal stick which worked better) and then traced over the outline when transfers the drawing to the wood. Then I went over those faint lines with pencil.
Then I used a jig saw to cut out each part of the sign.
Next I routed out he background using a small router. That went pretty smooth but I had to work very slowly and carefully to try and get the letters as smooth as possible. This took about 4 hours for both sides of all the pieces. I then went around with a small rasp and sandpaper to clean up the edges.
This is what the sign looked like before painting.
I started by painting the entire sign with a white porch paint (3 coats).
Then I painted the background using blue exterior paint. This was a semi-gloss and it also took 3 coats and 4 hours or so since I had to use a small brush to get right up to the text.
The final step in this stage was to screw the parts together. I drilled pilot holes with a special countersink bit then used 2" lifetime guarantee deck screws from both sides. I used wood putty to fill the countersink holes and painted over them. Finally, screw eyes were put in at top to hang the sign.
I then worked on the design for the iron work to hang it from the building. I had to get up on the roof to measure every detail of the facade.
I wanted to use some of the design elements from these vents on our building:
Mainstreet Collierville's logo also uses the vent grill design so I was able to get some ideas from it. I used various bowls and glasses to draw the circular forms (for lack of a compass).
Oreo wants to help:
I used an exacto knife to cut out the design:
This is the final template that will be traced onto the metal piece.
John Wright Hall (Copper Hall Designs) will use his metal working and welding skills to cut out the bracket using a plasma cutter and outline it with 1" bar stock. I'll then paint it with black enamel and we are ready to hang it on the building. Due to the old and fragile nature of the building's brick, most of the weight will be carried by a strap over the top of the parapet. More to come...
First an introduction. When we decided on the location, we knew there was an issue with the signage. As you can see from this photo, the area above the windows/awning is hidden for half the year by two large Ginko trees.
 |
| From New Sign |
I like the trees especially in their fall color but they do present a problem for signage. So we decided to do what the previous proprietor did and place our signage on the two large picture windows instead.
 |
| From Square Beans Coffee Open |
 |
| From Square Beans Scenes |
This was better but we still received lots of comments that indicated that our shop was still not very noticeable by drivers and from pedestrians walking along the north sidewalk. Finally, I decided we need to go ahead and put a sign up over the awning. My idea was to create a wooden sign based on our logo and hang it projecting (perpendicular) from the wall so that it would be easily seen behind the trees when driving along Center street and walking along the north side of the square.
 |
| From New Sign |
The next step was to get a design approved by the Historic District Commission. This is not difficult but it can be time consuming. They only meet once a month and the application has to be in a month before that. There is also a lot of detail that goes into the application and you must follow the design guidelines. Our application was approved in the meeting on September 18th. One of the stipulations in approving the design is that I have to remove one of the signs in our windows since you can only have two signs facing the street.
Time to start on building the sign. Originally, I was going to use a local sign company to build the sign but when I explained what I wanted, they said they couldn't build that kind of sign and said I'd have to find someone else so I decided to make it myself. I started by looking for the right wood. One of our customers, John Hall, suggested checking out Craig Lumber, for hardwood choices. I explained to them what I wanted to do and he suggested a piece of Japanese Poplar. It was 14" by 10' and 1 1/4" thick. They ripped it to 11" and planed it smooth for me. Next, using the blue print that was submitted to the HDC:
 |
| From New Sign |
I blew it up and printed it out in multiple sheets at full size then taped the sheets together to form templates for each section of the sign.
 |
| From New Sign |
 |
| From New Sign |
Now to transfer the design to the wood. First I tried cutting out the design and tracing it but this would not work very well with the text.
 |
| From New Sign |
So I tried and old trick from art school, I rubbed the back of the paper with a soft pencil (later I used black charcoal stick which worked better) and then traced over the outline when transfers the drawing to the wood. Then I went over those faint lines with pencil.
 |
| From New Sign |
Then I used a jig saw to cut out each part of the sign.
 |
| From New Sign |
 |
| From New Sign |
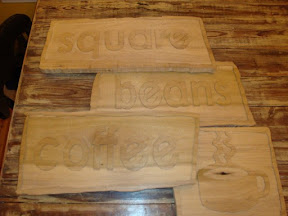
Next I routed out he background using a small router. That went pretty smooth but I had to work very slowly and carefully to try and get the letters as smooth as possible. This took about 4 hours for both sides of all the pieces. I then went around with a small rasp and sandpaper to clean up the edges.
 |
| From New Sign |
 |
| From New Sign |
 |
| From New Sign |
 |
| From New Sign |
This is what the sign looked like before painting.
 |
| From New Sign |
I started by painting the entire sign with a white porch paint (3 coats).
 |
| From New Sign |
Then I painted the background using blue exterior paint. This was a semi-gloss and it also took 3 coats and 4 hours or so since I had to use a small brush to get right up to the text.
 |
| From New Sign |
 |
| From New Sign |
The final step in this stage was to screw the parts together. I drilled pilot holes with a special countersink bit then used 2" lifetime guarantee deck screws from both sides. I used wood putty to fill the countersink holes and painted over them. Finally, screw eyes were put in at top to hang the sign.
 |
| From New Sign |
 |
| From New Sign |
I then worked on the design for the iron work to hang it from the building. I had to get up on the roof to measure every detail of the facade.
 |
| From New Sign |
I wanted to use some of the design elements from these vents on our building:
 |
| From The Square |
Mainstreet Collierville's logo also uses the vent grill design so I was able to get some ideas from it. I used various bowls and glasses to draw the circular forms (for lack of a compass).
 |
| From New Sign |
Oreo wants to help:
 |
| From New Sign |
I used an exacto knife to cut out the design:
 |
| From New Sign |
This is the final template that will be traced onto the metal piece.
 |
| From New Sign |
John Wright Hall (Copper Hall Designs) will use his metal working and welding skills to cut out the bracket using a plasma cutter and outline it with 1" bar stock. I'll then paint it with black enamel and we are ready to hang it on the building. Due to the old and fragile nature of the building's brick, most of the weight will be carried by a strap over the top of the parapet. More to come...
Subscribe to:
Posts (Atom)


